 |
| The Littlest Pet Shop Case |
My daughter starts school August 30th and the only thing we were missing was a clear or mesh backpack. My criteria for this: it needs to at least appear that it will stay together longer than a week and it needs to be “girly” (my daughter wanted a pink one). We looked at Target, nothing. I was told that Walgreen’s had them on sale 2 for $10.00. So I went to Walgreens not only did they look cheap but they were all little boys colors (black, blue, brown, and red). I then went to Wal-Mart (not my favorite store but desperate times call for desperate measures) but they were out and when I asked they said the new shipment was due anytime between now and the 6th of September. I decided fine I will just order it on-line. The backpack I found was clear with black trim but I refuse to pay more than $20 for something that will more and likely fall apart in two weeks (sorry, Jansport but $32.00 for a clear pink backpack was a little too steep.) I decided that we would just order it soon but it more and likely would not make it for the first day of school. I was disappointed, because I really wanted to get her a backpack for the first day of school but the thought of traveling all over town literally kept me up at night. Sunday morning I walked into my daughter’s bedroom and there was this clear plastic container that was shaped like a backpack.
My brain went into overdrive – WAIT! I COULD MAKE A BACKPACK! I grabbed the carrying case (that once was used to hold Littlest Pet Shops) and ran to the pantry to see if her lunchbox would fit. It did! I was so excited I then decided to carefully dismantle the backpack and sew it back together with extra pockets and stuff. My first challenge was to find straps for the backpack. I went searching through my daughter’s closet (she had to have something I could use) I found and old Disney Princess backpack and the straps were pink!
 |
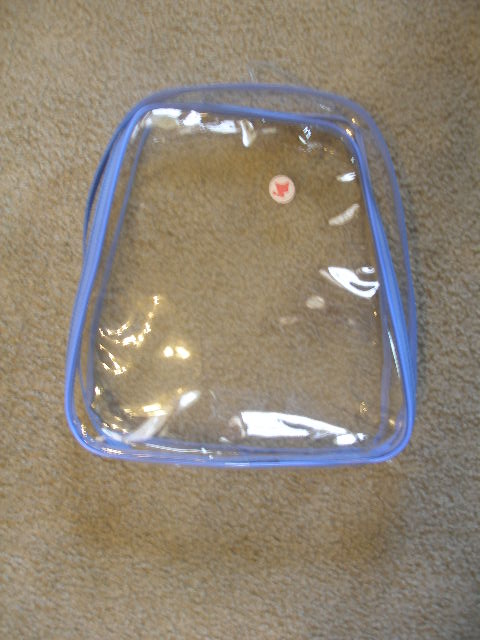
| A picture of the backpack before I sewed them together. |
I went through and removed the zipper and the binding (bias tape) off the bag very carefully. I then found another old plastic container and took that apart for the plastic (vinyl). Once everything was separated I faced a dilemma, pull out the sewing machine and risk ripping the plastic (vinyl) or sew it by hand. I chose to sew it by hand. The first thing I did was attach the straps (I am aware this should have been one of the last steps but I wanted to ensure sewing it by hand would work). I then cut the pocket for the front out and decided to add a pocket for pencils and miscellaneous items. I add Littlest Pet Shop Fabric to the top of each pocket (to act as bias tape) and hand sewed that together. Once I added the front pocket to the front part of the bag I was ready to assemble. I realized I needed to add vinyl to the bag (it needed to be the width of the zipper, so it would fit correctly.) Once that was added I was ready to install the zipper (by hand). I turned the inside out (which was a chore) and proceeded to install the zipper. Once the zipper was completely installed I used the bias tape I removed and sewed it over the zipper giving it a little more reinforcement and a finished look. I turned the backpack right-side out and sewed one last seam with pink thread. It took twice as much time as I thought would (a day and a half of hand sewing) besides my sore fingers, I am very pleased with how it turned out and I know it will be the only one.
My daughter loves it and it fits wonderfully!
 |
| Modeling the backpack! |
UPDATE: I added an additional 2″ to the bag after seeing a clear one in person. The two inches made it the same size as a normal backpack! Remember keep those vinyl bags you never know when you will be inspired to make a backpack.
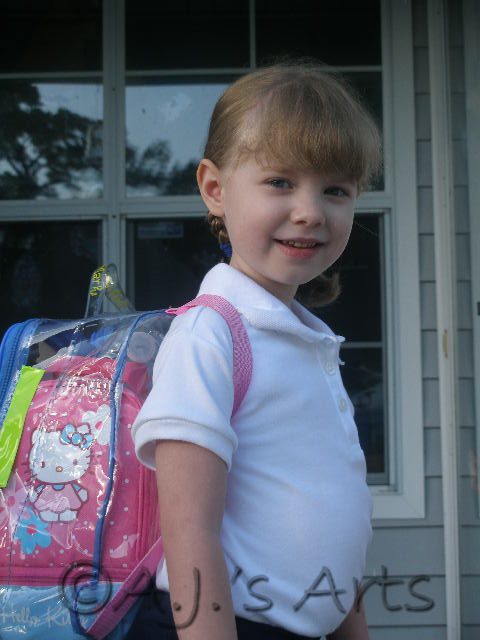 |
| 1st Day of School modeling the expanded backpack |
![]()


That was brilliant of you to come up with all that!
Thank you. One of my crazier moments but it turned out fantastic and she loves it.