First you need a design – either 125×125 or 150×150 pixels.
 |
| This button was created in Illustrator and is 150×150 Pixels |
 |
| This button was made in Photoshop and in 125×125 |
Once you have your design you need a Photo Hosting Site: Flicker, Photobucket, Picasa (I use Photobucket)
 |
|
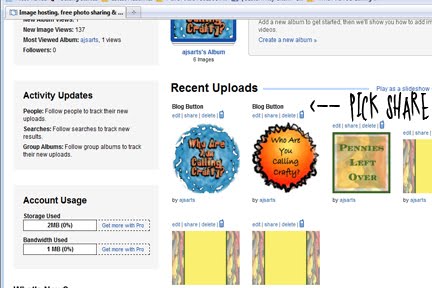
| Upload to your favorite Photo Sharing Site (this is Photobucket). Pick Share |
 |
|
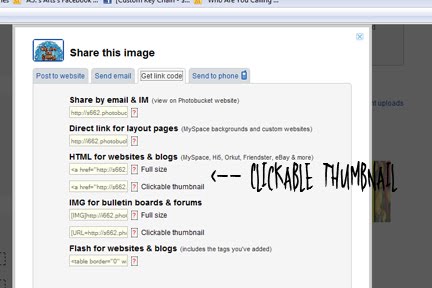
| Choose HTML – Clickable Thumbnail (TRUST ME! I did full size and it didn’t work – it was HUGE! So I had to start over.) |
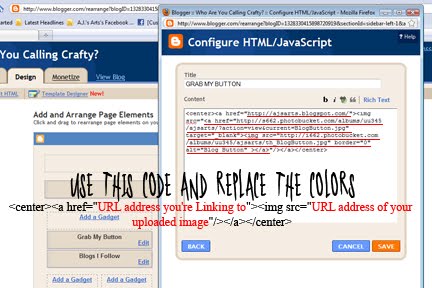
Once you have this part open Blogger –> Design –> Add Gadget –> HTML/JavaScript
Add your title: GRAB MY BUTTON or something cheesy
Now let the fun begin – I used several sites for this and was confused out of my mind (I get confused easy) so I am going to try to write this as if I was explaining how to do this over the phone to my mom (please keep in mind my mom doesn’t own a computer.)
This is the code you need to import (copy and paste it)
<center><a href=”URL address you’re Linking to“><img src=”URL address of your uploaded image“/></a></center>
 |
| The first code is the main page of your blog (Example: http://ajsarts.blogspot.com/) The second code is the HTML code from your favorite photo sharing site (Example: <a href=”http://s662.photobucket.com/albums/uu345/ajsarts/?action=view¤t=BlogButton.jpg” target=”_blank”><img src=”http://i662.photobucket.com/albums/uu345/ajsarts/th_BlogButton.jpg” border=”0″ alt=”Blog Button” ></a>) |
Now you should have a code that looks like this:
<center><a href=”http://ajsarts.blogspot.com/”><img src=”<a href=”http://s662.photobucket.com/albums/uu345/ajsarts/?action=view¤t=BlogButton.jpg” target=”_blank”><img src=”http://i662.photobucket.com/albums/uu345/ajsarts/th_BlogButton.jpg” border=”0″ alt=”Blog Button” ></a>”/></a></center>
SAVE –> VIEW BLOG
If you like how this looks… you are ready to continue. Yes there is more. How are we going to “Grab Your Button” if you can’t “Grab It?”
Now we are going to add a scroll box (DEEP BREATH – Almost done, promise!)
Here is the code for the scroll box:
<div style=”border: 3px solid black; overflow: auto; height:
125px; width: 125px; color: black; background-color: white;”>YOUR
TEXT HERE</div>
Design–>GRAB MY BUTTON (or whatever you named it) and add that code under the Button Code.
 |
| Once you have added the scroll box under the button HTML – take a deep breath. Copy the original button (just the button). Go to this site and paste that code in there. |
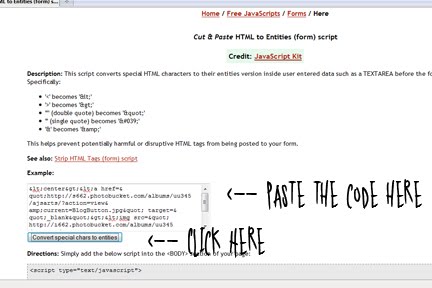 |
| Once you have the converted code. Copy the code and Paste it in YOUR TEXT HERE. Then SAVE! |
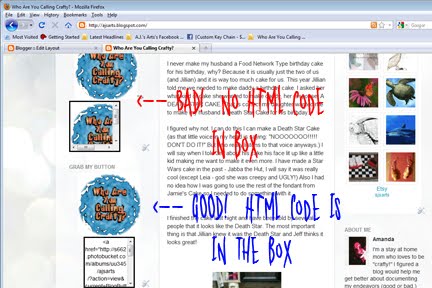 |
| Notice how the top scroll box has the image in it and NOT the HTML code that is because I did not modify the code before adding it. If you do not modify the HTML code the top picture is what you will get! |
I really hope this makes sense and I hope it helps.
The website to modify HTML
Jenieshell’s Design Challenge Blog – Where I got the codes from and finally figure out how to do it after much cursing.
Go back into the GRAB MY BUTTON (or whatever you named it) and find the following code for the scroll box:
<div style=”border: 3px solid black; overflow: auto; height:
125px; width: 125px; color: black; background-color: white;”>YOUR
TEXT HERE</div>
The text highlighted in blue is for the line around the outside of the box. Type your favorite color there I chose tan.
The text highlight in red is for the text inside the text box. Type your favorite color there I chose teal.
You can also change the background color of the inside box by changing the color (highlighted in green) but I decided to leave mine white.
Hope everyone enjoys this tutorial.


Thanks for such a helpful tutorial! I included in my roundup of tutorials for making blog buttons here: http://www.thecraftyscientist.com/2011/06/roundup-blogging-resources-blog-buttons.html. Check it out if you want and grab a featured button! : )