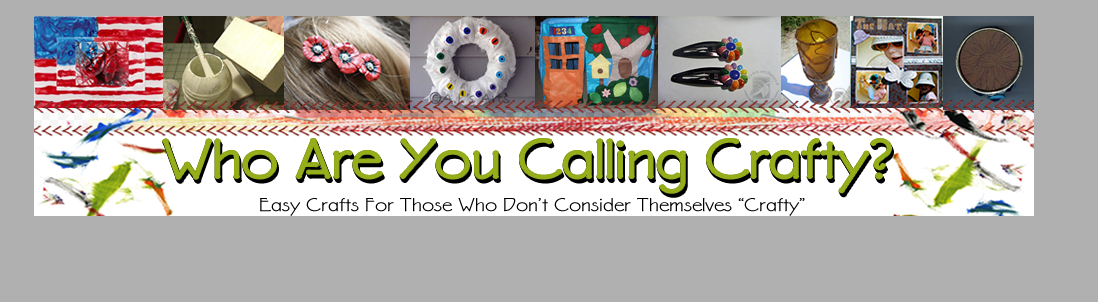
In my free time I went though and completed a new banner. I know what you are thinking “It is just your old banner with photos.” It is but it isn’t, each of those photos is hyper linked to that blog post (Manda Happy Dance Right Now!) and if you move your mouse over the photos the title will show up.
So this is a long tedious process but because I never want to forget how to do this I decided to type out a very long blog post (with a code!) THIS CODE WILL GIVE YOU THE TEMPLATE TO MAKE SOMETHING SIMILAR FOR YOU OWN BLOG. Copy and paste this code into Text Edit (Apple) Note Pad (PC) and replace the colored text with your own.
One quick note I will share if you use Photobucket it will automatically put in a hyperlink (web address you the photo) YOU DO NOT WANT THIS! YOU WANT IT TO BE HYPERLINKED TO YOUR BLOG POST – YOU MUST DELETE THE CODE IN ORDER FOR IT TO WORK. You should only have ONE <a href= “http://www.YOURBLOGPOST.com”/>
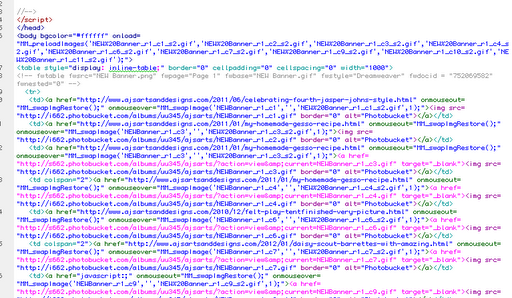 |
| This is a screen shot from Dreamweaver – see the pink? That was the second code that needed to be deleted. |
You can create any image in Gimp, photoshop, Fireworks, etc. I would recommend using the following pixel sizes for any item you create. Unless you are very HTML SAVVY (I am not that savvy to type out how to change the code):
Flag Photo: 125×90 pixels
Gesso Photo: 125×90 pixels
Poppy Hair Comb: 125×90 pixels
Mummy Eyeball Wreath: 125×90 pixels
Felt Tent: 125×90 pixels
Daisy Barretts: 125×90 pixels
Candle Holder: 75×90 pixels
Robins Nest Page Layout: 100×90 pixels
Faux Woodburning: 90×90 pixels
The Bottom Image (where the Titile is) 1000×120 pixels
Take the photos you just created and upload them to Photobucket (or what ever hosting site you want) and copy the HTML CODE and paste it into your document. Add what web page you would like your project to go to and add a title.
Next open Blogger –> Layout –> Add Gadget –> HTML/Java Script –> Copy all of the new code from Note Pad or Text Edit and Paste –> Save –> View
Test the links to see if all is well. If everything is good, remove the Page Header and Save.
THE CODE: (Please keep in mind I am not a coder, I figured this out on my own. If there is a problem with the code I will try my best to fix it.)
<table style=”display: inline-table;” border=”0″ cellpadding=”0″ cellspacing=”0″ width=”1000″>
<!– fwtable fwsrc=”NEW Banner.png” fwpage=”Page 1″ fwbase=”NEW Banner.gif” fwstyle=”Dreamweaver” fwdocid = “752069582” fwnested=”0″ –>
<tr>
<td width=”171″><a href=”http://www.YOURBLOGPOST.com” onmouseover=”alt=”TITLE – WHAT YOU WANT TO SEE WHEN MOUSE MOVES OVER THE PICTURE” title=”TITLE – WHAT YOU WANT TO SEE WHEN MOUSE MOVES OVER THE PICTURE“/”><img src=”YOUR HTML IMAGE FROM A PHOTO HOSTING SITE (PHOTOBUCKET)” /></a></td>
<td width=”164″><a href=”http://www.YOURBLOGPOST.com” onmouseover=”alt=”TITLE – WHAT YOU WANT TO SEE WHEN MOUSE MOVES OVER THE PICTURE” title=”TITLE – WHAT YOU WANT TO SEE WHEN MOUSE MOVES OVER THE PICTURE“/><img src=”YOUR HTML IMAGE FROM A PHOTO HOSTING SITE (PHOTOBUCKET)/></a></td>
<td width=”163″><a href=”http://www.YOURBLOGPOST.com” onmouseover=”alt=”TITLE – WHAT YOU WANT TO SEE WHEN MOUSE MOVES OVER THE PICTURE” title=”TITLE – WHAT YOU WANT TO SEE WHEN MOUSE MOVES OVER THE PICTURE”/><img src=”YOUR HTML IMAGE FROM A PHOTO HOSTING SITE (PHOTOBUCKET)“/></a></td>
<td colspan=”2″><a href=”http://www.YOURBLOGPOST.com” onmouseover=”alt=”TITLE – WHAT YOU WANT TO SEE WHEN MOUSE MOVES OVER THE PICTURE” title=”TITLE – WHAT YOU WANT TO SEE WHEN MOUSE MOVES OVER THE PICTURE”/><img src=”YOUR HTML IMAGE FROM A PHOTO HOSTING SITE (PHOTOBUCKET)/></a></td>
<td><a href=”http://www.YOURBLOGPOST.com” onmouseover=”alt=”TITLE – WHAT YOU WANT TO SEE WHEN MOUSE MOVES OVER THE PICTURE” title=”TITLE – WHAT YOU WANT TO SEE WHEN MOUSE MOVES OVER THE PICTURE“/><img src=”YOUR HTML IMAGE FROM A PHOTO HOSTING SITE (PHOTOBUCKET)”/></a></td>
<td colspan=”2″><a href=”http://www.YOURBLOGPOST.com” onmouseover=”alt=”TITLE – WHAT YOU WANT TO SEE WHEN MOUSE MOVES OVER THE PICTURE” title=”TITLE – WHAT YOU WANT TO SEE WHEN MOUSE MOVES OVER THE PICTURE“/><img src=”YOUR HTML IMAGE FROM A PHOTO HOSTING SITE (PHOTOBUCKET)” /></a></td>
<td><a href=”http://www.YOURBLOGPOST.com” onmouseover=”alt=”TITLE – WHAT YOU WANT TO SEE WHEN MOUSE MOVES OVER THE PICTURE” title=”TITLE – WHAT YOU WANT TO SEE WHEN MOUSE MOVES OVER THE PICTURE“/><img src=”YOUR HTML IMAGE FROM A PHOTO HOSTING SITE (PHOTOBUCKET)”/></a></td>
<td><a href=”http://www.YOURBLOGPOST.com” onmouseover=”alt=”TITLE – WHAT YOU WANT TO SEE WHEN MOUSE MOVES OVER THE PICTURE” title=”TITLE – WHAT YOU WANT TO SEE WHEN MOUSE MOVES OVER THE PICTURE“/><img src=”YOUR HTML IMAGE FROM A PHOTO HOSTING SITE (PHOTOBUCKET)” /></a></td>
<td><a href=”http://www.YOURBLOGPOST.com” onmouseover=”alt=”TITLE – WHAT YOU WANT TO SEE WHEN MOUSE MOVES OVER THE PICTURE” title=”TITLE – WHAT YOU WANT TO SEE WHEN MOUSE MOVES OVER THE PICTURE“/><img src=””YOUR HTML IMAGE FROM A PHOTO HOSTING SITE (PHOTOBUCKET)”/></a></td>
</tr>
<tr>
<td colspan=”11″><a href=”http://www.YOURBLOGPOST.com (I recommend your general blog address here)” onmouseover=”alt=”TITLE – WHAT YOU WANT TO SEE WHEN MOUSE MOVES OVER THE PICTURE” title=”TITLE – WHAT YOU WANT TO SEE WHEN MOUSE MOVES OVER THE PICTURE”/><img src=”YOUR HTML IMAGE FROM A PHOTO HOSTING SITE (PHOTOBUCKET)” /></a></td>
</tr>
</table>
The highlighted HTML coding is the bottom of the banner (on mine it is where the Title is).